In this article we will walk your through all the steps and options you need or can go through as race organizer using the RaceID Timing App. See the different steps and menus below, scroll through them all or click the one you are interested in to jump straight to that section.
- Download the new Timing App and Log In
- General Introduction
- tabs
- settings
- participant cards - Using the Timing App
- checkpoints - Participant Tab
- start recording - Timing
- Event and Results Management
- Messages
- Preparing for Race Day
- Demo Account and Test Race - Different Start Types
- mass start
- one-by-one start
- wave start - Race with Checkpoints
setting up checkpoints in Admin
setting up timing assistants in Admin - Offline Mode
- Race Workflow Examples
Download the new Timing App
To get started - start by downloading the app in the App Store or Play Store
Before using the App for the first time, we recommend you to watch our introduction video below:
Logging In
To log in, use the same email and password that you have for your organizer account in the RaceID Admin, or log in to the Timing Assistant account that has been set up for you.
General Introduction
Before opening the app, have a look at the list below to understand the structure of the app:
Tabs
There are 5 different tabs on the bottom of your screen:
- Event: the first screen that will appear when you login to the app. All your published events will be visible, and by clicking on an event all of its distances will appear. You can find settings and distance specific tools for all distances here.
- Checkpoint: in the checkpoint tab you can choose which checkpoint you want to time at, if you have set up checkpoints in the admin
- Timing: the timing tab is the screen where you click on the participant’s card to record their times.
- Participants: in the participant tab you can see your start list and results for all your participants. You can add participants, view their personal details, and swipe on their name to make changes before the start.
- Messages: in the messages tab you can send notifications or emails to your participants.
Event, distance and result settings
You can find different tools and settings for your event, distance and results in the 3-dot menu on the top right corner of your screen. In the distance settings you can for example download your distance for offline use, and finish the distance when all participants have finished the race.
Participant Card
The card you press in the Timing tab to record a participant's time is called a participant card. You can edit what information you would like to show on your timing screen through the slider icon in the Timing tab, but the most common is to show the bib number and name.
Using the Timing App
Joining a Race
If you are logged in as a race organizer, start by choosing your event from the event list.
Race assistants have limited access to timing tools, so be sure to set up race assistant accounts in admin.raceid.com so that they can just focus on Timing.
Set up timing assistant account in the Admin
Distance List
Pressing on an event, you will see all of its distances.
Press on the distance to go straight in, or press the arrow to view distance-specific tools, such as
- Distance Settings, where you can stop or restart your race
- Results tools, where you can make changes to the results from your device
- Result History, where you can make changes to results from all devices and to the Live Results that are published on Raceid.com and in the RaceID app.
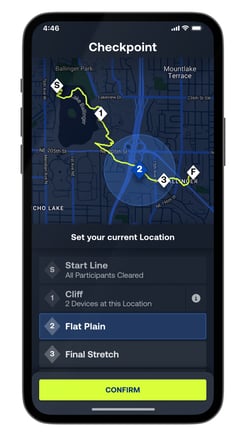
Checkpoints
If your distance has checkpoints, you will be asked to choose which checkpoint you want to time at.
You can set up a distance with checkpoints and a GPX map in the Admin
You can easily create GPX maps with services such as GPX Studio
Pressing on the Info icon will show you which devices are currently timing at that checkpoint.
Participants Tab
In the Participants tab you can see all your recorded times and who’s on the track:
Using the tabs at the top, you can filter by your participants’ progress:
- All: all participants are listed here.
- Unstarted: all participants who are not started yet are listed here. From here you can start timing some or all participants.
- Ongoing: all participants who have already started are listed here
- Finished: all participants who have any recorded times are listed here.
- You can also see all participants at a specific checkpoint or wave by choosing from the drop down menu below the filters.
Participant List
Swiping on participants gives you extra options, which are specific for each filter.
Unknown Racers: If you have recorded times for any Unknown Racers, you can select the participant here by pressing Select where the bib number would be.
If multiple times have been recorded for the same participant, you can select which time should be published from the “x2” button.
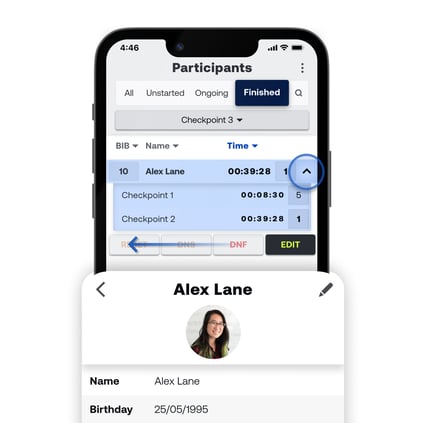
Pressing the arrow will show you recorded split times and race position for each checkpoint.
Pressing on a participant will bring you to their profile. Here you have all of their personal information, which is useful if you need to get in touch with them or their emergency contact.
You can also see and edit all recorded times for them at the bottom.
Start Recording
If the distance hasn’t been started yet, you will come to the Participants tab with the Unstarted filter active after selecting a distance.
This is how it looks for Mass Start races:

Swipe left on a participant's name if you for example mark them as DNF.
For one-by-one races, you can choose which specific participants you want to start timing: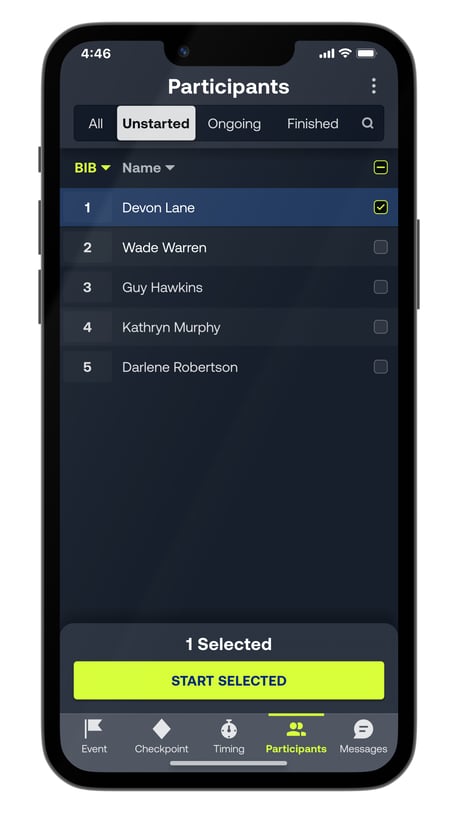
For Wave races you can start whole waves. By pressing the arrow you can see all of the participants in each wave:
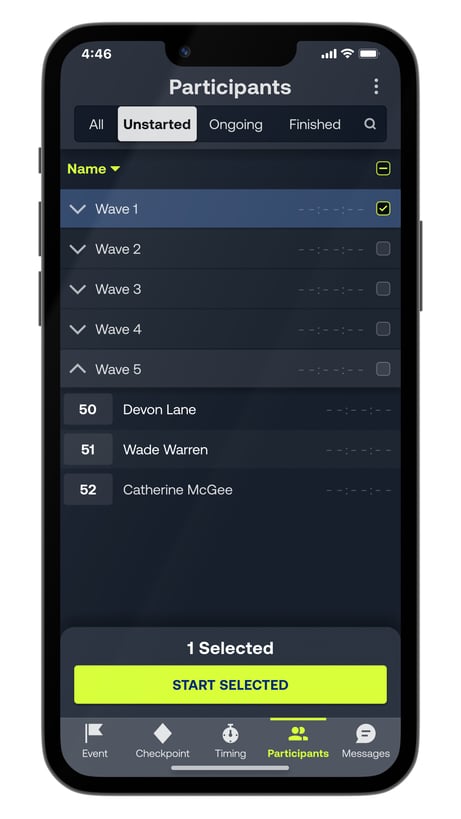
When your race starts, just press Start Selected at the bottom of the screen, or swipe on participants to start them individually, and start timing the participants for your checkpoint.
Timing
When the race has started, make sure that you have the Timing Tab (in the menu
![]() on the bottom of your screen) selected. You can now record times for participants as they reach your checkpoint.
on the bottom of your screen) selected. You can now record times for participants as they reach your checkpoint.
Your recorded times will appear at the bottom of the screen.
Here you can put participants back into the grid if you press them by mistake, or edit their recorded time.
Search
You can search for bib numbers by pressing the search icon. Press on a racer card, or press “Record Time” to only record the time for the inputted bib number.
Settings
In the Timing Options menu you can customize the size and content of each participant card. You can also filter the cards by gender, class, bib number range and alternating bib numbers.

Event & Results Management
The menu in the top right corner has all of the tools and information relating to your event and the app.
Distance Settings

Press on the Distance to see the tools relating to your chosen distance. Here you can:
- Reset the distance, which archives your current results so that you can start the distance again.
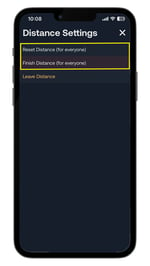
- Finish the distance, which will stop new results from being recorded.
- Download for offline use, which is perfect for downloading the participants to your device for when your upcoming race won’t have signal.
- And leave the distance, to join another distance.
- These tools are also available in the Distance list in the Event tab
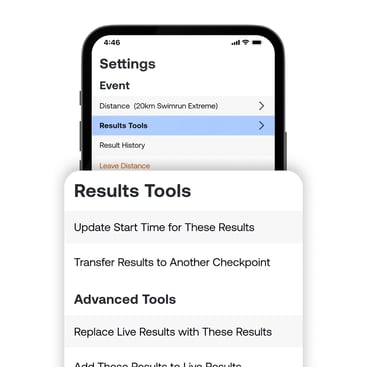
Results Tools
In Results Tools you can make changes to the time recordings that you currently have selected on your device. This includes:
- Updating the distance start time for your results
- Transfering your results to from one checkpoint to another
- Replace the Live Results (on RaceID.com and in the RaceID app) with your results
- And you can add the selected results to the Live Results, merging them together.
Results History
Finally in Results History you can manage all your recorded results and the results from other devices.
- In the first screen you can see the Live Results at the top, then individual results by different users.
- If you select just one set of results from the list, you will get the option to set it as the Live Results, replacing any existing Live Results
- If you select multiple results, you will get the option to merge these results into one set of results.
- By clicking on any set of results, you will see all of the recorded times. From here you can edit the times for specific participants.
Messages
In the Messages tab, you can send race invitations and updates to specific participants.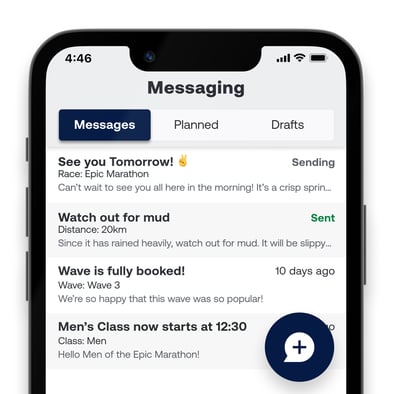
- When creating your message, you can schedule it to be sent at a certain time, and you can choose to send it as a push notification in the RaceID App and as an Email.
- If you want to send an invitation instead, you can invite participants from one race to sign up to another of your races.
Preparing for Race Day
Settings in Admin
It is only races with checkpoints that require special settings in Admin before the timing. For the different start options (mass start, wave start and one-by-one start) the start will look slightly different in the app. You can read more about this below.
One Distance per Device
If you have several different distances in your race, we recommend you to use one separate timing unit (tablet or smartphone) for each distance.
Edit Results in Admin
Should something go wrong during the race, you can always edit the results inside the Admin afterward. Read more about this HERE.
Edit Results in Timing App
You can also edit the results straight in the timing app. In the timing tab, when the Finished filter is activated, you can see all recorded results. By swiping left on a participant's time, you can edit their time.
Alternatively, you can open a participant’s profile and edit the times at the bottom. Here you can also unpublish times or give times to another participant.
Practice on your own Race
Before the race, we always recommend that you practice timekeeping at some point so that all officials / timekeepers feel prepared and ready.
It is possible to test drive your own race before the day of the competition.
It is important to keep in mind, however, to go into Admin and clear the results list before it is time for the competition day itself. This is done by going to the results list in Admin, going to settings and resetting the results, see more HERE.
Alternatively, you can just restart the distance from the distance settings, and decide later which sets of results you would like to use as the Live Results.
Practice Using Demo Race
If you haven't already created your event in Admin but want to try out the TiminApp before, we also have a demo race that you can practice on. Use the
Username: test.demolopp@raceid.com
Password: race123
when logging into the app. There are distances for all different start types, so feel free to try it out.
Different start types
There are 3 different types of starting the race:
Race with mass start
In a "regular" race with a mass start, where all participants start at the same time, the procedure is the following:
- Press start selected, to start the timing. You can also swipe left on a participant and select Set Start Time if some participants started late.
- Mark any participants with DNS in the start list inside the timing app, by swiping left on their name in the participant tab. This will remove them from the ongoing racers in the Timing tab.
- Open the timing tab on the bottom of your screen, and you will see all participant cards.
- Mark the participants one by one when they finish the race by tapping their names/bibs on their participant card on the screen.
- The times will be added to the bottom of your screen, and you can make quick changes directly in the list if you press a participant by mistake, by swiping left on the participant’s name.
- To find a specific participant card quickly, press the search icon on the top left of the screen and search for the bib number. Press either on the participant card or on “record time”. If you prefer to type in bib numbers rather than scrolling the default grid, you can stay in the search mode to record all times.
- To finish the distance, press the menu in the upper right corner of any tab. In this menu, under Event, select your running distance and press “Finish Distance”. You can also finish the distance from the distance list in the Event tab on the bottom.
- The results list will be synced directly online at raceid.com or in the RaceID app.
Race with wave start
For races with wave start, the different start waves / start groups need to be added inside Admin. When the race is then started in the timing app, one or more waves are started at a time.
- Select the checkbox of the waves you want to start and press start selected to start the timing.
- Mark any participants with DNS in the start list inside the timing app, by swiping left on their name in the participant tab. This will remove them from the ongoing racers in the Timing tab.
- Open the timing tab on the bottom of your screen, and you will see all participant cards.
- Mark the participants one by one when they finish the race by tapping their names/bibs on their participant card on the screen.
- The times will be added to the bottom of your screen, and you can make quick changes directly in the list if you press a participant by mistake, by swiping left on the participant’s name.
- To find a specific participant card quickly, press the search icon on the top left of the screen and search for the bib number. Press either on the participant card or on “record time”. If you prefer to type in bib numbers rather than scrolling the default grid, you can stay in the search mode to record all times.
- To finish the distance, press the menu in the upper right corner of any tab. In this menu, under Event, select your running distance and press “Finish Distance”. You can also finish the distance from the distance list in the Event tab on the bottom.
- The results list will be synced directly online at raceid.com
Race with one by one start
For races with an individual start, the participants will be sent away one by one, and have an individual clock ticking.
- Mark any participants with DNS in the start list inside the timing app, by swiping left on their name in the participant tab. This will remove them from the ongoing racers in the Timing tab.
- Select the checkbox of the participants you want to start, and press start selected. You can also swipe left on a participant and select Set Start Time if some participants started late.
- Do the same thing for all participants, one by one.
- Open the timing tab on the bottom of your screen, and you will see all participant cards.
- Mark the participants one by one when they finish the race by tapping their names/bibs on their participant card on the screen.
- The times will be added to the bottom of your screen, and you can make quick changes directly in the list if you press a participant by mistake, by swiping left on the participant’s name.
- To find a specific participant card quickly, press the search icon on the top left of the screen and search for the bib number. Press either on the participant card or on “record time”. If you prefer to type in bib numbers rather than scrolling the default grid, you can stay in the search mode to record all times.
- To finish the distance, press the menu in the upper right corner of any tab. In this menu, under Event, select your running distance and press “Finish Distance”. You can also finish the distance from the distance list in the Event tab on the bottom.
- The results list will be synced directly online at raceid.com
Race with Checkpoints as a Timing Assistant
For races with checkpoints, the participants will get split times along the course when passing by these set checkpoints. This requires unique timing assistants, please read more about this below. When the accounts are set up in Admin, you can start the Timing App.
- Once you have joined the distance, you will be shown which checkpoint you are assigned to.
- When the race starts, only assistants with the ability to start races can finish the distance. You can set this up in the Admin.
- Mark any participants with DNS in the start list inside the timing app, by swiping left on their name in the participant tab.
- Open the timing tab on the bottom of your screen, and you will see all participant cards.
- Tap the name of each participant passing by your station and they will be added to the list, with their split time at your check point.
- The procedure is the same for all different checkpoints, as well as for the finish line.
- When the race finishes, only assistants with the ability to finish races can finish the distance. You can do this from the menu in the top right corner, and press on your active distance. You can set this up in the Admin.
Setting up Checkpoints in Admin
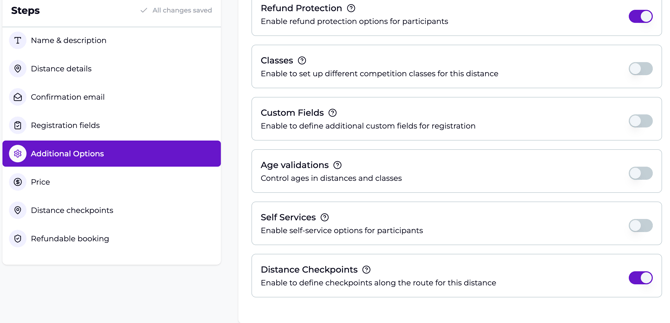
For races with checkpoints along the course, you need to add the different stations in Admin before starting the app. This is done as follows:
- Go to section Additional Options in the distance settings in Admin and make sure that the toggle "Distance Checkpoints" is activated:
- Add your checkpoints in Distance checkpoints:

- You need to add a timing assistant to each checkpoint.
Setting up Timing Assistants in Admin
You can set up a new timing assistant in the section "Accounts" in the left hand menu in Admin:
Click on "Add Assistant" and create your account here:
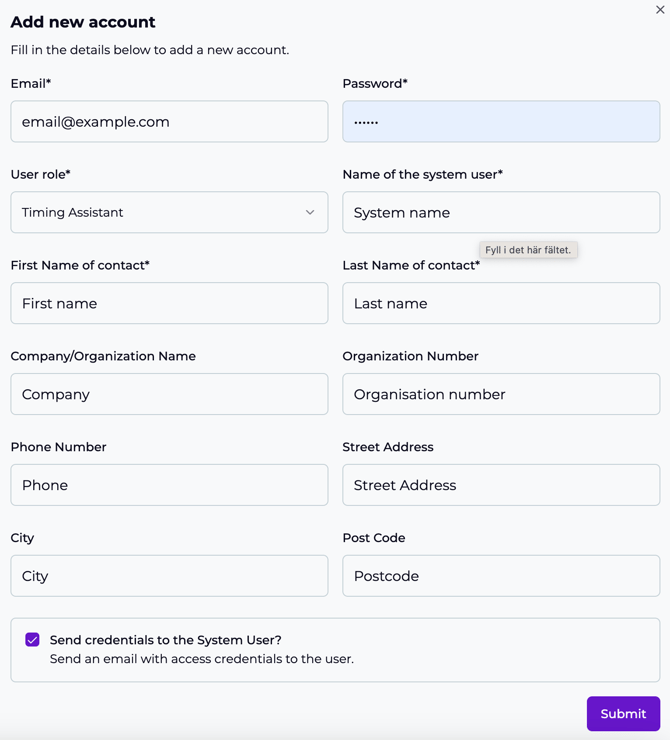
Submit and make sure that you connect the assistant to the checkpoint!
Press on each timing assistant to give them the ability to Start or Finish a distance from the Timing app.
We propose you name the various assistants after the names of the checkpoint stations they are responsible for, and create unique logins. They do not have to consist of real email addresses.
Once the distance has been started in the app, the various assistants can connect to the race from each device. Each assistant logs in with their assigned login details, and only ticks off the participants at their station when they pass during the race.
If you have multiple assistants at the same checkpoint, you can filter which participants each of them sees by pressing the slider icon in the top right of the Timing tab. This is useful if you want each assistant to focus on a different bib number range, gender, or alternating bibs.
Offline Mode
If you lose connection to the internet, you will record times in offline mode. This means that all data will be stored only locally at your timing device. As soon as you have a connection again, the data / results will be synchronized with the Live Results. If specific times have not synchronized, press the orange cloud icon by each participant’s times.
Offline Assistants
If you are an assistant without the permission to start timing, you will be able to start recording times anyway if you are offline. Your results will be archived when you come online again to make sure that you do not overwrite the Live Results, and your device will load the Live Results instead. Admin users can merge your offline results with the Live Results through the Results History menu in the top right menu.
Unstable Internet
If your connection is unstable, it may be easier to set your device to Airplane mode by swiping down from the top status bar.
Download Distance or Event
To prepare for timing without internet connection, go to the settings menu on the top right corner. In the Event tools, select your distance and you will come to the Distance Settings. Press Download for Offline Use, and your distance is available in the app even though your connection might be bad.
Race Workflow Examples
Here are some examples of how these tools might be used to assist with managing different sets of results.
- Syncing Results with Some Offline Starts:
- You have a race with multiple devices, and some have started timing offline because of connection issues or because they are in airplane mode to save battery. You wish to merge these together with the correct times.
- Whenever the offline devices come online, their results will be added to Results History and they will begin recording new results in the Live Results.
- You can merge the offline results with the Live Results, and the start time for the offline results will change to be the same as the earliest of the merged start times. Now, the time recordings in the offline results will change to account for the updated start time.
- Syncing Results with Offline Device at Start Line:
- You have a race with multiple devices, and the device at the start line is offline when starting the race.
- Other timing assistants will not be notified that the race has started.
- If your online timing assistants do not have permission to start the distance, they will need to go offline / into airplane mode to begin timing.
- To correctly manage these results, you can either:
- Make sure that the device at the start line comes online before all other devices, so that their results will be set as the Live Results with the correct start time.
- Or, if an assistant has come online first, their results will be the Live Results. You will need to manually update the start time of the Live Results in the Results Tools. If you are already recording in the Live Results, you may need to leave the distance first, and access the Results Tools from the Distance List.
That's It!
Now you’re ready to time your race! If you need any more help, head over to support.raceid.com to read more in-depth information about the Timing App
or get in touch with us by emailing organizer@raceid.com.
And good luck!